
N3 Level
- Getting Started
PART 1
- Important Considerations
PART 2
- Setting Up The N3
PART 3
- Understand What You See - The 2 Main Scenarios
PART 4 - Practicing What We Know - The Practice Exercises
 |
PART 5 - Final Thoughts - 3 Easy Steps
INTRODUCTION
Taking it to the Next ... Level
The Wild N3 is a high precision optical instrument , but only when set up properly . Set up or used incorrectly , the N3 soon becomes an instrument of destruction , with the customer's product quality & quantity going down the drain , flurries of engineers running 'round in circles trying to figure out why .
Obviously the N3 must be setup properly , checked on site often for accuracy , and sent out for calibration by a certified Pro on a regular basis . This tutorial will attempt to approach only the very first step , setting up the instrument , with a very basic method designed to help intermediate users get going quickly and with total confidence .
Of course , to some 'shooters' or instructors this method will seem to be complete overkill . That may be because they do not understand the points raised here or because they prefer to teach or use the old school method , which doesn't take as much thought or consideration for the actual mechanics behind the N3 . I can only suggest reading this tutorial and then forming your own thoughts by keeping an open mind to these new points offered .
PART ONE

Critical Considerations
The N3 is actually a 'double articulating' device . The 'Gun' moves independently of the 'Lower Body' and the 'Lower Body' moves independently of the 'Base' (and vice-versa) . Actually , when we add the tripod into the equation we have a 'triple articulation' .
This is yet another consideration for taking extra care with each and every shooting assignment . Error can never be totally 100% eliminated from our setups . However , we can easily minimize it so that the error is well within certain acceptable tolerance levels .
Never Assume !
What's the #1 rule of Optical Alignment ? Correct - "absolutely never assume" . The true measure of skill concerning optical instrument implementation is not in the setting up of the instrument , but is in the 'level of awareness' that a shooter may possess .
This awareness is both learned and intrinsic . It takes years and years of shooting to be able to automatically recognize the possible problematic ingredients that surround each and every assignment . However , it also takes the inert/inherited ability to be able to 'instinctively' sleuth out and acknowledge new and unique problems that have never before been encountered .
In A Certain State
Finally , and eventually , one may even extrapolate simple concepts , such as 'Flux' - simply defined ; everything and anything is always in a state of flux and is moving at all times , in both a random direction as well as a 4 dimensional cyclical vector . Once a person begins to accept certain notions as fact , one may begin to look at their shooting environments in a totally new light .
This may sound like advanced optical alignment theory but is in fact just basic common sense . Everyone knows that heat and cold expand and contract materials , and that some materials are more easily affected than others . Vibration can move things and everything vibrates .
Those are just 2 ingredients in a long list of things to consider . Sunlight , overhead cranes , not enough sleep , fork lifts and tractor trailers , curious production staff , bolt torque , too much coffee , frost , lint , stick men in love ... it goes on and on and on .
The Human Factor
The primary factor of focus will be human error ... our error , or our stickman's error . This must be eliminated first and foremost and a good deal of that error will be washed away the day we finally stop assuming . Good shooters are also good detectives . Shooters routinely see very big objects on a very small scale .
We look at a paper machine's 50 ton granite press roll under a kind of a microscope . The N3 is accurate to less than a "thou" at short range . Across a 45 foot machine roll it is good for ~ a thousand of an inch . So when we see something move 5-10 thousands of an inch for no apparent reason , it will primarily be up to us to try and explain why . After a while , sleuthing it out becomes a kind of second nature .
PART TWO

Set Up The Machine
The N3 is a machine , with many moving parts and several controls . It has a very specific function , to level very accurately . N3's are deadly accurate , yet very basic in design and function . It's absolutely imperative that the operator understand the simple concept behind the N3 in order to be effective in the field .
Understanding the N3 is also the 'primary key' to using the N3 with confidence , and confidence is the first order requirement for any instrument man . Understanding is also a key ingredient to setting up the N3 quickly .
First - Level The Tripod
1) Secure your tripod legs . Level the instrument mounting surface with a bubble level at the elevation required for your shots .
2) Uncase your N3 and wipe it's base with the bare palm of your hand (not a rag) and also wipe the
tripod's surface the same way .
Now The Instrument
3) Snug the N3 down and align the gun across the axis defined by 2 of the three thumb screws . Bring the circular base bubble into absolute dead center using the 3 thumb screws .
Spending time with this very first step will speed up the split-bubble alignment .
- Do not attempt to look at this bubble from overhead but use the adjustable mirror .
If it's missing , get a handheld one .
4) Rotate the N3 180 degrees to check your circular bubble for errors . If bubble then wanders off center then the bubble is out of level
-
- compensate by taking out half the error with the thumb screws and spin 180 to verify accuracy . Spin 90 and repeat for the other axis .
5) Center the tilting screw , either visually or by going stop-to-stop and backing it off
exactly 50% .
- If stop-to-stop is 10.5 turns , then rough-center will be 5 1/4 turns from
either stop .

Zeroing
6) Rotate so that you're directly aligned with the axis defined by 2 thumb screws .
7) Look at your Split-Bubble and you should see both left and right Splits .
- If you don't see both , check your circular bubble again and adjust thumb screws
if needed .
- If you still don't see both bubbles , adjust the tilting screw until both bubbles
just come into view .
-
Do not bring the bubbles into alignment ! Let's establish
what & where the error is FIRST .
- Do visualize and , as always , remember exactly where the bubbles are for future reference .
8) Rotate the instrument 180 and observe the Splits again . What do you see ? What does
it mean ?
Well , that's the key question and once you understand what you are seeing your confidence level will rise accordingly . Let's go through that understanding process .
PART THREE

Understanding What You See
First , understand there are 2 entities that we are dealing with - the Gun and the Lower Body . Both have to be leveled . By setting the circular bubble in dead center we can be fairly confident that the lower body is fairly level ( unless the circular bubble is damaged ) . However , we don't have such a device for leveling the gun , so we can only 'rough-center' it . Rough-center may be 'True' , but then again , maybe not .
When we first looked at our split bubbles and then rotated 180 degrees , if the Gun was indeed perfectly centered , possibly because it hadn't been moved since our previous accurate shooting assignment , we would now see a 'mirror image' of the bubbles . Right ?

 |
This scenario indicates that the 'Gun' is in it's 'True-Center' and that the error is in the Lower Body . |
|
| Mirrored Split Bubbles As N3 Rotated 180 Degrees |
Think about this now . If the gun is at it's 'True Center' and perfectly level we will see a mirror image of the bubbles at 180 degree rotations because that is the only error left to eliminate , the error in the lower body . In one direction the right side bubble will be down a certain amount , and when spun 180 degree the right side bubble will be up the exact same amount . Beautiful !
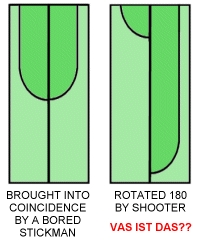
Now , let us examine the opposite scenario . If the lower body is perfectly level and the gun is tilting up or down , when we spin 180 we will see the exact same image repeated . Does this make sense to you ?
|
|
This scenario indicates that the Lower Body is perfectly level and that the error is in the Gun . |
|
| Identical Split Bubbles As N3 Rotated 180 Degrees |
Think about this part now . The Gun is pointed (tilted) upwards , so no matter where we spin the instrument , throughout the 360 degree circle , the bubbles will always show the exact same error , if the lower base is indeed perfectly level . Once again ... beautiful !
Chances are you've never thought about this before but hopefully a light will go on for you now once a little thought is put into visualizing the above 2 scenarios . In fact it might be best to pause here until this part is understood , before proceeding further .
So now that we understand this fact , from now on we can level via the circular bubble , look at the split-bubbles , spin 180 degrees , and just by looking at the split bubbles again , we can determine how much is 'Gun Error' and how much is 'Lower Body Error' . N'est pas ? Hopefully you will answer "yes!!" .
Typically Speaking
For instance , on any typical day , we will have a combination of Lower Body error and Gun error . The Gun error may add to the amount of split-bubble separation or it may subtract from it . Either way , once we know what to look for we can determine what the error ratio is with just a glance and realize exactly what we have to do in order to bring the split-bubble into 'coincidence' .
Most setup instructors will tell you to take out half the error with the tilting screw and half the error with the thumb screw . This is a big assumption . To assume that it's half gun and half body is not a good start on the road to accurate setup and shooting . Sadly , that is exactly how instrument people for decades have been doing it . Eventually the N3 will get leveled the old way , but it's not the right way .
The lower body could be within range if you did a good job with the circular level . Same for the gun , if it never got moved from the last shot , and the last shot had a very level Lower Body . So why take out error the 'half & half' way ? Personally , I think this is just plain bad advice . Why instruct a person to break the cardinal rule of shooting (never assume) before they even get started ?
Never assume and never adjust the level until you know where the error is and how much . Once we understand the basic principles we can truly know where the error is , how much is there and also why we are working this way .
Let's practice this principal right now using some of the following exercises . Examples of situations one will eventually have to contend with when working in the field .
PART FOUR

We'll quickly go through a few setups in an effort to familiarize the user with the basic theory , in a kind of suedo 'hands on' way . In exercise #1 we'll go slower and in more detail , coming up to speed as we become more confident .
Never fear , this is no cakewalk . As a matter of fact , it can be very confusing and is probably why it has basically been ignored up until this point . The old method actually worked ... eventually!
We've all seen shooters walking around & around their instrument in a kind of square dance , slowly but slowly getting closer , then farther away briefly , then closer again until finally , bang !!! (close enough) .
Practice Exercise #1
We've centered the Tilting Screw adjuster , and have rough leveled the Lower-Body via the circular level's feedback , and have aligned the instrument directly across the primary axis defined by 2 of the 3 thumb screws . Now , take a look at the Split-Bubble in this initial 'Zeroed' position .

Above we observe what we may very well see on a typical setup if we did indeed take the time to center the 'Circular-Bubble' as best we could , in an effort to get a solid starting point for our Lower-Body . At first glance it appears we are in the ballpark . Now , let's do our first 180 degree rotation and have another look . Before we begin our turn make a mental note how much the right bubble is showing slightly low .

OK , good . We see that both Lower-Body and Gun are contributing to the 'total leveling error' in the same direction . We'll begin our correction by adjusting the Thumb Screws which will eliminate the Lower-Body error . Be very careful to move both Thumb-Screws the same amount in order to keep the Lower Body and Gun at the same elevation ('Thumbs-In' to ensure that as one screw goes up , the other goes down) .
Remember now , if Image-2 is the same as Image-1 then the Lower-Body error has been eliminated . However , keep in mind that as we adjust Image-2 , Image-1 is also changing . Correct ? So we will move toward Image-1 by 50% . That is to say , we will take out half the Lower-Body error .

Very Good . Now , complete this axis leveling and place the bubbles in coincidence by taking out the remaining Gun error with the Tilting-Screw .
Almost Done
Good . Now rotate the N3 180 degrees in order to place the instrument back to our starting point position . Observe that the bubbles are well within operating tolerance . We are finished adjusting the N3 on this axis and can now advance to the second axis that is perpendicular and directly across the 3rd Thumb Screw .

Turn the N3 90 degrees . We will remove the error from the second axis using just the single remaining untouched Thumb Screw . "Why use just the thumb screw ?" , you may well ask . The reason is because we have previously established that the Gun is now in it's 'True-Center' operating state . Therefore any error showing on this axis must be Lower-Body error .
If in doubt , quickly rotate 180 degrees and check your coincidence before you make any adjustments . It should be showing a 'mirrored error' , which will mean that the Gun is centered but the Lower-Body is not level , agreed ? Bring the Split Bubble into coincidence with the single Thumb-Screw , then turn 90 degrees to make sure we are still within operating tolerance across our primary axis .
Done !
Congratulations ! You have just attained your all important , 'Instrument Height' , and are now ready to pick up the benchmark that will tell you what that elevation is . If you are just doing a simple multi-point leveling job you are ready to get going now . Just remember that you must be in as close to 'perfect coincidence' as possible when taking any and all shots , and that from now on only your Tilting-Screw will be used to accomplish that .
Practice Exercise #2

Above we see that once again both Lower-Body and Gun are contributing to the 'total leveling error' in the same direction . Now , we can also see that the second image is very close to being a duplicate of the Zeroed image , which means that there is almost no Lower-Body Error . Do you agree ? So then almost all of the error showing must be Gun error . Excellent !
Also note that the small amount of Lower-Body error may be difficult to adjust considering that we need to remove just 50% of the error showing with the Thumb Screws . It's possible of course , but it may be best to leave it for now .
In this particular case it may be best to accept the Lower-Body error showing , and just correct the Gun error . The small amount of Lower-Body error can be removed at 'Shot Time' . Therefore , bring the Split Bubbles into coincidence with the Tilting-Screw .
Good , turn your 90 and place the Bubbles in coincidence with the Thumb-Screw only and you are done ! Keep in mind that you will encounter the uncorrected Lower-Body error as you swing about and will have to remove it with the Tilting Screw .
This is typical anyway , as the floor/tripod/lower-body are constantly adding up to very slight errors that must be continually removed with the Tilting Screw (depending on the jobsite of course) .
Practice Exercise #3

Above we see a different example but it is still very easy to see at a glance what the situation is . Quickly we notice that it's almost a mirrored image situation , so therefore mostly Lower-Body error is the culprit and very little Gun error is contributing . Good , big Lower-Body errors seem easier to remove than small ones , sometimes .
Anyway , we might automatically ask ourselves "which do we remove first?" , as in , "what's our first move ?" . It would be too difficult to try and visualize how much Lower-Body error we should attempt to remove in this example , but it is very easy to see how much is Gun error . Always correct the easiest error first . Use the process of elimination to your advantage .
So then simply remove half the Gun error . This will now give you that mirrored image situation that you will correct by bring the bubbles into coincidence via the 2 Thumb Screws .
If you're still asking yourself , "why is that determined to be Gun error in Image-5 ?" , the answer will always-always fall back to the 2 main scenarios , 'mirrored or identical' . In this example we can see that it is almost a 'mirrored scenario' , and mirrored scenarios are a result of Lower-body only error , correct ? So then , the error that is preventing a mirrored scenario must be Gun error .
Depending on how well you visualized and remembered the bubbles relationship at the zeroed position , you should be able to remove both errors here at 180 , and then turn your 90 and remove the Lower-Body error with the single Thumb-Screw and be ready to shoot .
As I said previously , this may not be easy to grasp at first , however , with a little practice it can become second nature . It will take practice of course . However , we don't always have access to an N3 to refresh our memory with , but if you just come back to this web page once and a while , or when required , you can quickly get back up to speed .
Practice Exercise #4 - Old School
OK , above we see an example of the way we've been working all these years . So what's our first move ? Sorry but , you got me there . I mean , first of all , what was done to place the bubbles into coincidence ? Was the Tilting-Screw used ? Why ? Were the Thumb Screws used ? Again , why ?
Did we add more error when we brought the bubbles together at the 'Zeroed' position ? Maybe , maybe not . Was more Gun error added ? Maybe . Was more Lower-Body error added or removed at the 'Zeroed' position ? There is absolutely no way of knowing .
We've essentially just shot ourselves in the foot , and now we shall 'dance around the tripod' until we finally figure out which way is up . We will make a half&half move (take out half the error with the Thumb Screws and half with the Tilting Screw) and turn 180 again and see if it helped or made things worse .
PART FIVE

Final Points To Ponder
1) Zero the Gun & rough level the Lower-Body
2) Turn 180 , observe and remove errors
3) Turn 90 and remove error with 3RD Thumb Screw
That's it , you're done !
Next time you see a guy setting up an N3 , video tape it and then dub in some music . Pure entertainment - try not to get dizzy . Then again , that may be a bit cruel considering we've all done the 'circle dance' ourselves a few times .
Please don't get me wrong . I personally used the Old School method myself and hated it , but used it anyway simply because that seemed to be the only way documented . I eventually just got good at setting up simply because I was doing so much of it that I could setup without even thinking about the process .
Then one day I discovered that there were several different variations of the common 'old school' theme , which really made me wonder , made me think ... think of a better method !
We all know guys who can set up an instrument very quickly , but they are probably just working on instinct . If you asked them to explain how they do it so quickly they may not be able to actually write it down . They can just do it , simple as that .
This web page is for those who do not work with the N3 very often and who find themselves getting very frustrated when they try to get going on a leveling assignment . This is for those who have been sent out on a job and have to refresh their memory while they are trying to set the N3 up , sometimes with the customer or supervisor standing there watching and evaluating . Not a good moment .
This is also for those who are just beginning their training or apprenticeship . Get good at this quick and easy method now and you will remember it forever , always being able to grab a healthy N3 and set it up with just a few turns .
Cheers & Hope This Helps !